This tutorial was published in the May/June 2008 issue of N Scale Magazine.
 |
| Walthers NKP # 207 0-8-0 On Upper Level Of The "Original" JJJ&E |
Recently Walthers (LifeLike) released the much-heralded USRA
0-8-0. This steamer has long been on many an N Scale steam aficionado’s wish
list. Older versions of the 0-8-0 suffered from poor running characteristics
and detailing that in retrospect weren’t great. Two of the 0-8-0’s that come to
mind were the Bachmann 0-8-0 and the Rivarossi 0-8-0. Each loco had it’s own
set of problems that continually plagued the loco.
The Walthers USRA came with an impressive list of spec’s
which include:
All-New
Model * All Drivers Geared * Traction Tires for Superior Pulling Power *
All-Wheel Electrical Pickup on Loco & Tender * DCC Ready - Socket in Tender
* Railroad-Specific Details * Accumate® Knuckle Couplers * Flywheel Equipped
for Smooth Operation * Constant Intensity & Directional Headlights * RP-25
Contour Wheels - Operate on Code 55 or Larger Rail * Heavy Diecast, Split-Frame
Chassis * Five-Pole Skew-Wound Motor.
The
only spec in question was the five-pole motor, which in turn was actually a
three-pole motor. The three-pole motor actually is quite powerful and the 0-8-0
performs extremely well at very low speeds.
The
all wheel pickup on the steamer and tender enhance the performance of this
steamer in switching situations. The traction tires come factory installed on
the fourth driver. There is a spare driver if the modeler doesn’t want to use
the traction-tired driver and is easily changed. The operating Accumate
couplers on both the front pilot of the steamer and the tender are a nice
feature and work well with Micro-Train Couplers. The frame of the steamer is
die cast and the loco has a good weight for it’s small size. However additional
weight can be [laced in the steamer and tender without taking apart the entire
loco.
The
Walther’s 0-8-0 comes packaged in a box similar to the offerings of Life-Likes
2-8-8-2 and 2-8-4 Berkshire. (See photo 1)
 |
| Photo # 1 |
The steam loco and tender are packaged in separate
compartments in the box. The modeler must join the tender and draw bar to the
loco with a screw and accompanying
washer. When the 0-8-0 has to be stored you can’t leave the steamer and tender
assembled. This is one of the drawbacks of this box set up, but you can widen the
steam loco compartment to store the completely assembled 0-8-0 without too much
difficulty ( See Photo # 2 ).
 |
| Photo # 2 Factory Box With Locomotive & Tender |
The Walthers USRA 0-8-0 is an extremely well detailed steamer.
The detailing is comparable to the LifeLike 2-8-8-2 and 2-8-4 Berkshire. I rate
this steamer in the high end of detailing when comparing N scale steam loco’s
(See Photo # 3 and # 4 ).
 |
| Photo # 3 Overhead View Of Walthers USRA 0-8-0 |
 |
| Photo # 4 Overhead View Of The Boiler And Front Coupler |
There are however several problem areas with the Walthers
0-8-0. The first is the six pin-connecting plug that connects the steamer loco
to the six pin receptacle in the tender. These wires are very delicate and
fragile. The wiring can easily pull from the six-pin plug during normal
handling of this loco. One must be very careful when the plug is placed in the
tender. Walther’s charges a $15 service fee for any warranty repair work on
this steam loco. This might be a source of concern for the modeler as this is a
definite weak point in the design of the steamer. Once a wire is dislodged from
the six pin plug it’s almost impossible to resolder the connection to the
plug ( See Photo # 5 ).
 |
| Photo # 5 Overhead View Of Locomotive Cab And Six Pin Plug |
When test running this loco, I also came to the conclusion
that some lead weight could be added to the steamer to improve it’s
performance. Out of the box with a Lenz mini silver decoder installed, this
steamer would pull about 12-15 cars on level track.
The ideal place to install weight in this small loco was
between the cylinders near the gear plate, in the steam and sand domes of the
boiler, beneath the windows in the cab and under the cab roof. (See Photo’s #6
through # 10 ). I used A-Line moldable lead weights in the steam and sand domes of
the boiler. To remove the boiler shell, you first must remove the right and
left ash pans. The boiler shell will lift off with a slight amount of pressure.
In between the cylinders near the gear plate I used three small pieces of
A-Line weight 1/16 inch thick. One piece of this weight was added under the cab
roof and two pieces were each placed under each cab window. This addition of
weight was sufficient to improve the performance of the loco initially by about
20%. Of course your results will vary depending on your layout and track work.
 |
| Photo # 6 View Of 0-8-0 Wheel Arrangement |
 |
| Photo # 7 A View Inside the Boiler Shell Of The Locomotive |
 |
| Photo # 8 A View Of Front Coupler Box |
 |
| Photo # 9 A View Of The Wheel Arrangement And Front Coupler Box |
 |
| Photo # 10 Moldeable Lead Placed In Empty Spaces Inside Of Boiler Shell |
With the boiler shell removed, you can get a birds eye view
of the motor that drives the Walthers 0-8-0. Yes indeed it is a three-pole
motor and not five poles as Walther’s originally stated in advertisements in
train magazines. Walthers revised their specs of the motor after this was
discussed in depth on many of the model railroad forums. It is now listed as a
three-pole motor. In spite of being only three poles, this motor is still very
powerful. At very low speeds using DCC, I estimated this steamer could travel
at 1 MPH. This is quite impressive. (See Photo 11)
 |
| Photo # 11 Side View Of Drivers And Valve Gear Of The Walthers USRA 0-8-0 |
As this point, I decided to change the Accumate couplers to
Micro Trains Z scale # 905 couplers. The JJJ&E has no level track on it’s
120’ mainline, and I wanted to make sure that I have no surprise uncoupling of
rolling stock on the long 2% grades. The MT Z scale # 905 looks more
prototypical for this steamer than the N scale Accumate coupler.
I lined up the Micro Train Z scale #905 so that its sits in
the middle of a Micro Trains N Scale coupler when coupled to an adjacent car or
loco. I placed two styrene shims for the coupler in the front pilot. I used one
styrene shim for the body mounted Z scale # 905 on the tender body. Once the
shims were cemented in place with some CA cement, I placed the couplers in
position on the front pilot and the tender body with a dab of CA cement. I
measured the height of the couplers while the cement was setting to make sure
they were in the proper position in relation to an N scale coupler of an
adjacent freight car. When the cement had completely set up, I tapped a hole in
the styrene for the MT Z scale # 905 mounting screw and fastened the couplers
permanently. (See Photo’s 12 through 16) You can see how prototypical the Micro
Trains Z scale #905 coupler looks when it’s compared with the N scale Accumate
coupler in Photo 15.
 |
| Photo # 12 Box Of MT Z Scale #905 Couplers |
 |
| Photo # 13 Factory Front Coupler Removed And Coupler Box Shimmed For # 905 Coupler Placement |
 |
| Photo # 14 MT Z Scale # 905 Coupler Installed |
 |
| Photo # 15 Comparison Of MT N Scale Coupler On Left & MT Z Scale # 905 Front Coupler On Right |
 |
| Photo # 16 MT Z Scale #905 Body Mounted On Rear Of Tender Body |
Now for the decoder installation in the Walthers USRA 0-8-0.
The decoder for this steamer must be mounted in the tender. The light board in
the tender contains an eight-pin receptacle for the decoder When you remove the tender shell from the
frame (it just lifts off), you notice right a way there is little room for a
decoder. Before I received the steamer, I envisioned putting a sound decoder
and speaker in the tender. With present technology, this can’t be accomplished.
Even with removal of the upper weight that sits under the coal load, enough
space for a speaker and a decoder doesn’t exist. (See Photo 17) You can see the
factory installed eight-pin plug in the light board. This is used for DC
operation and must be removed for the decoder installation. For this
installation I chose a Lenz silver mini decoder. This is one of the smallest
decoders in N scale. It is comparable to the Lenz mini gold decoder. However
the Lenz mini silver costs 30% less than the Lenz mini gold decoder. The Lenz
mini silver decoder supports the BEMF function. It’s measurements are L 0.43” x
W 0.35” x H 0.11”). The height of the decoder is a critical factor in
determining it’s use for this installation. There is barely 0.15” of space
available to position this decoder between the upper weight and light board
below. See Photo # 18 & # 19 )
In contrast, Walthers suggests in its literature to use a
Digitrax 143 PS, which has an eight-pin plug. Besides the decoder being too large, the height of the eight-pin
plug is also too large, preventing the tender shell from seating at all.
I adapted the Lenz mini silver decoder with a NMRA
standard eight-pin plug, soldering the seven wires of the decoder to the plug.
(See Photo 18). The directions that come with the decoder tell you which wire
goes to each pin of the plug. After soldering the wires in
place on the plug, I covered the decoder with some Kapton
tape to protect the decoder from coming into any contact with metal of the
weight or the light board. (See Photo 19)
 |
| Photo # 17 View Of Insides Of Tender After Shell Was Removed. |
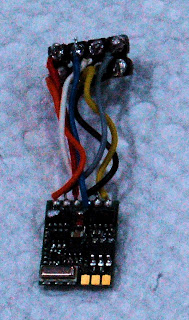 |
| Photo # 18 Lenz Mini Silver Decoder Wired To An Eight Pin Plug |
 |
| Photo # 19 Kapton Tape Wrapped Around Lenz Mini Silver Decoder |
Now remove the factory installed eight-pin plug from the
light board. Be careful when you lift it out so that you don’t bend or break
the pins. It doesn’t come out easily. (See Photo 20). Now unscrew the top
weight from the tender body. Be careful not to strip the thread of this screw.
Sometimes it doesn’t come out easily. (See Photo 21) Gently seat the Lenz mini
silver decoder with the eight-pin plug in the receptacle on the light board.
Make sure you line up the pins before seating the decoder.
(See Photo 22)
 |
| Photo # 20 Factory Installed Eight Pin Plug Removed |
 |
| Photo # 21 Lead Weight Removed So Lenz Mini Silver Decoder Can be Seated In Place |
 |
| Photo #22 Lenz Mini Siver Decoder Inserted In The Eight Pin Plug. Kapton Tape Protects The Decoder From Lead Weight That Will be Placed On Top Of The Decoder And Screwed In Place |
 |
| Photo # 23 Lead Weight Screwed In Position On Top Of Lenz Mini Silver Decoder |
Flatten out the wires in the light board gently before
placing the upper weight in position. Then screw the weight permanently in
place. (See Photo 23) I also added some A-Line moldable lead putty in the
rectangular crevice on top of the weight. Shape the lead putty so it conforms
to the rectangular outline of the weight. Space for this installation is at a premium. The
tender shell should seat properly if this is done properly. If the shell
doesn’t seat, trim some of the putty away. You might also have to adjust the
position of the lead weight or in some cases completely remove the weight and add moldeable lead putty in its place.
A second way to install a decoder in the Walther’s 0-8-0 is
to use a decoder without a NMRA eight pin plug. In this case, you first remove
the factory installed eight-pin plug from the receptacle on the light board.
Then unscrew the light board from the base of the tender. Gently lift the light
board up taking care not to break the two soldered wires that go to the motor
contact strips of the tender. It doesn’t take much pressure to break a solder
connection. You can then hardwire the decoder to the back of the printed
circuit board. This bypasses the need for a decoder with an eight-pin plug.
Place some Kapton tape under the circuit when soldering is complete. The
decoder itself is mounted under the upper removable weight in the tender as in
the first installation. Walthers very briefly describes this second method of
decoder installation in an addendum that is supplied with the instructions.
 |
| Photo # 24 All Styrene Shims Will Be Painted Grimy Black |
Now I touched up all parts that I added to this steamer. I
painted all the styrene shims that I added for the Z scale couplers. I also
painted the lead weights between the cylinders black. I painted the side rods
and valve gear as well as the drivers with some NeoLube blackening agent using
an 18/0 sable brush. The tender trucks were weathered slightly with some Rail
Tie Brown. I finished two Nickel Plate 0-8-0’s for this tutorial (See Photo’s # 24 through # 28 ).
 |
| Photo # 25 Coupler On Front Pilot Painted Grimy Black along with the weight added to the 0-8-0 frame. |
 |
| Photo # 26 Styrene Shim Painted Grimy Black On Rear Of Tender Frame |
 |
| Photo # 27 Side View Of Finished Walthers USRA NKP # 207 0-8-0 |
 |
| Photo # 28 Two Completely Finished NKP USRA 0-8-0's |
The Walthers NMRA NKP 0-8-0 on the upper level of the JJJ&E
with working MT Z scale couplers, with a decoder installed inside the tender
and judicious placement of additional weight in the steamer and tender (See
Photo # 29 & # 30 & # 31 ).
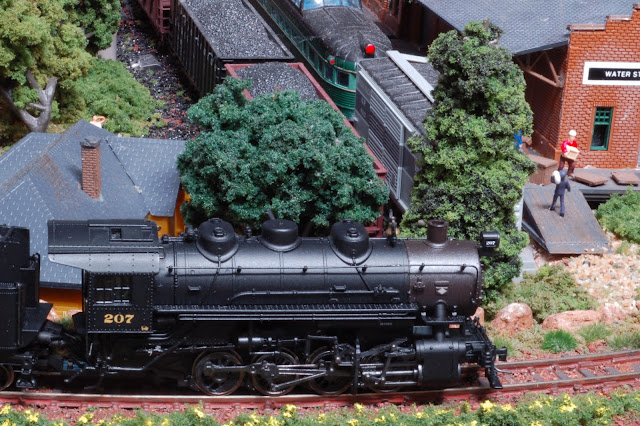 |
| Photo # 29 USRA NKP #207 0-8-0 On Upper Level Of The "Original" JJJ&E |
 |
| Photo # 30 Two USRA 0-8-0's In The Monterrey Mountains On The "Original" JJJ&E |
 |
| Photo # 31 Closeup Of USRA 0-8-0 Coupled with a Double Door Sea Board Box Car |
In conclusion, the Walthers 0-8-0 steamer fills a void that
has been present in N Scale steam for many years. There are some problems to
iron out in regards to additional weight in the loco and tender, but these are
simple remedies to fix. The experienced modeler as well as the novice can do
this without taking the entire steamer apart. The decoder installation is
relatively easy, once you choose the right decoder. One must realize the space requirements
for the decoder are miniscule to say the least.
This small steamer will perform well if you temper your
expectations. The Walther’s 0-8-0 won’t pull 40 cars up a 6% grade. More
reasonable expectations might be 10-12 cars after a significant break-in time
(8-10 hours) on level track. It is very delicate and must be handled with care.
With increased running time this steamer will perform very well. The key is to
run the loco and enjoy its performance. It is a wonderful small steam
locomotive,
Stay cool and run steam............


No comments:
Post a Comment