The JJJ&E Logo

Thursday, October 30, 2014

N Scale Locomotive Encyclopedia

N Scale Locomotive Encyclopedia

The N Scale Locomotive Encyclopedia is a great reference for most of the locomotives made in N scale.

Mark a.k.a. Spookshow, a member of the old Atlas N Scale forum has spent many years putting this Encyclopedia together. Mark has reviewed most of the locomotives in N scale along with the help of other N Scale modelers.

It is an excellent source of current data on N scale locomotives and is highly recommended as a source material on the performance of N scale locomotives.

N Scale Encyclopedia

Unitrack 2 7/16 Inch Snap Conversion Track

Unitrack 2 7/16" Snap Conversion Track

Kato makes a Unitrack 2 7/16" Snap Track Conversion track. This is a very useful section of track if you want to use Atlas code 80 sectional track coming off a turntable. One end of the track has regular Unitrack Uni-Joiners and the other end of the track has code 80 Atlas Uni-Joiners. This track can also be used with Atlas code 80 flex track and Peco three foot track sections.


This track section can also be used with double track sections as well.

Cutting Unitrack

Cutting Unitrack

Sometimes you'll be working on a track plan and find that you need a specific odd section of track that Kato doesn't make. What do you do?

The easiest approach is to take a straight or curved section depending on the piece you need and cut it to fit the size of the section you need. A straight razor back saw does this task easily. First you cut through the rails and then through the gray plastic road bed.

You then must cut out a small section of roadbed from the cut end of the specialized piece of Unitrack you just made. This will allow to use  Uni-Joiners or  regular rail joiners to connect the two pieces of Unitrack together. Before this connection is made, you must also remove a Uni-joiner from an uncut section of Unitrack. Then you can join the two pieces together.

Granted using regular rail joiners isn't an ideal situation, but you can create odd size pieces of Unitrack using this technique. I've used this method on occasion when completing the  Original JJJ&E and "new" JJJ&E track plans with Unitrack.

It solves a problem. that often goes like this..... Why doesn't Kato make a section of Unitrack "this" length.

I would avoid cutting turnouts or crossovers to size until you really becomes experienced using this technique. I've only cut turnouts once or twice and the results were fine.

You can practice this technique on spare pieces of straight Unitrack for starters. Make sure that you use a sharp blade in your razor back saw. That is the only pre-requisite.

Chemist's Review Of Track Cleaning Methods and Tony's CMX Track Cleaning Cars

Chemist's Review Of Track Cleaning Methods and Tony's CMX Track Cleaning Cars

Here is a chemist's review of Tonys Track cleaning car (the CMX+) and track cleaning methods. This will clear up any misconceptions on what method and material to use to clean your track. This is a "must" read and will keep your trains running without any problems due to "dirty" track.

"Dirty" track isn't usually a problem with Unitrack but read the review anyways. It will enlighten you and discusses many options.


Chemist Reviews CMX Clean Machine | Tech News at Tony's Train Exchange.

Wednesday, October 29, 2014

What Height Should You Make Your Bench Work For Your Unitrack Layout?

What Height Should You Make Your Bench Work For Your Layout?

The height of bench work for a layout depends on several factors. One important point to consider is your own height and reach. If you area a very tall person, bench work 44 -48 inches high probably won't be adequate for you. A shorter person will have trouble with layout bench work over 50 inches high.

So where do we compromise to get bench work height that is acceptable. The viewing angle is also very important. I am 6' 2 inches tall and am building bench work for the "new" JJJ&E that is 52 inches high. This gives a nice heads on viewing area if I am seated on a chair at the edge of the bench work. I also like to take closeup photo's with my camera, so a heads on viewing angle is very important.

The frame of the bench work of the "new" JJJ&E is 48 3/4 inches high with a 3/4" plywood base. For plywood, I was able to get wood that was knot free. Four inches of pink foam covered the plywood base. This thickness of foam allows me to cut scenery below track level. If you decide to raise any part of your layout, this will increase the height of the viewable area. On the "New" JJJ&E part of the mainline will rise 3-4 inches above the lowest point of the mainline. Add some mountain scenery to this mix and you have track work and scenery that could reach over 60 inches high. This all has to be planned carefully when you design a layout.

You also have to be able to reach the furthest point of the bench work. I use a small two step ladder with a tray on top to hold supplies. This allows me to reach the 30 inch wide bench work plus the four foot turnaround areas with no problems. I happen to have a long reach so the four foot square areas aren't an issue.

If you can't reach the furthest part of your bench work easily, by all means don't build your bench work that wide. Access is important to work on scenery as well as being able to reach trains if there is an occasional derailment.

What are your thoughts about the height and depth of permanent bench work on a layout?

Tuesday, October 28, 2014

Another Alternative To Hand Painting Unitrack Rails Or Any Track

Another Alternative To Hand Painting Unitrack Rails Or Any Scale Track


I've always hand painted Unitrack track rails with an acrylic based paint and a 18/0 red sable brush. (You can also use an oil based paint.)

On the "new" JJJ&E, the rails are going to be a grimy black, so this time I tried Neolube # 2 which turns metal black. It is a conductive agent and prior to this I used Neolube # 2 to blacken steam locomotive drivers and valve gears as well as the side rods. The Neolube does a great job in blackening the rails and I'm using it as well as grimy black to weather the rails of the "new" JJJ&E. The Neolube can easily be wiped off the top of the rails with a small rag. Since it is a conductive material, there won't be any electrical concerns during application. You can use a 18/0 sable brush to apply the Neolube.

You can order Neolube # 2 at MicroMark and it can only be shipped by a ground service, since it does contain alcohol.

A Reverse Loop Wiring For DCC Discussion In Any Scale

Reverse loop wiring presents an interesting challenge in model railroading. You don't encounter any problems when wiring reverse loop for DCC in N scale or any scale.

There are many reverse loop modules/switches that are available and easy to use on a DCC layout in N scale or any scale.

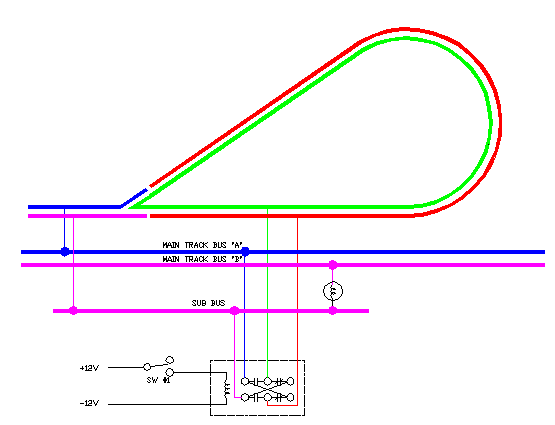
The module/switch consists of four wires that require connections. Two wires are connected to your track before a train enters the reverse loop. The remaining two wires are connected to the rails inside the reverse loop. The reverse loop must be isolated from the rest of the layout by using plastic rail joiners.


You cannot use Reverse Loop Modules/Switches for wiring reverse loops in DC systems. There are many Reverse Loop Modules/Switches that can be used for reverse loops in DCC layouts.

The Reverse Loop Module/Switch automatically changes the polarity of the rails when a train enters and leaves the reverse loop.

You can also wire a block occupancy detector inside the reverse loop if your layout uses block occupancy detection.

Dog bones, Wyes and Turntable also need Reverse Loop Modules in DCC N scale layouts as well as any other scales.

The most important rule to follow for reverse loops is that the train in the reverse loop must be shorter than the reverse loop itself if that train has metal wheel sets or lights.. If the length of the train is longer than the reverse loop a short circuit will occur.

In N scale most rolling stock of trains come equipped with plastic wheel sets. If the plastic wheel sets are changed over to metal wheel sets then this rule must be followed.

Each reverse loop requires its own Reverses Loop Module/Switch.If you use one Reverse loop Module/Switch to control more than one reverse loop, at some point you're going to short out your system when two trains enter reverse loops controlled by one Reverse Loop Module/Switch at the same time.

The "original" JJJ&E had four reverse loops and one turntable. Each reverse loop was controlled automatically by its own Reverse Loop Module/Switch.

So, if a track plan has more than one reverse loop and you're using DCC, don't feel that the wiring is too difficult to do. The Revere loop Module/Switch solves the wiring problem easily.

Reverse loops provide some very interesting train operations and the operator of a layout with reverse loops can't put the trains operating on such a layout on auto pilot.

Have fun wiring reverse loops with Reverse Loop Modules/Switches. When you run trains through these reverse loops, you'll notice no change in the trains momentum as they glide through the reverse loops.

Switching Over To DCC From DC On A Unitrack Layout... What To Do?

Switching Over To DCC From DC On A Unitrack Layout... What To Do?

Many people decide to start a DCC layout while they operate a DC layout. Which should one do while making the transition from DC to DCC on a Unitrack layout.

Many will be surprised to note that it only takes two wires to switch from DC to DCC. You need only connect the two wires from the DCC command station to your track to get started. You must also disconnect the DC power supply and use a power supply that is DCC friendly.The rest of the wiring need for DCC can be added over a period of time. The blocks you have in DC can be used on a DCC layout except you no longer need toggle switches as a train progresses from one block to another around a layout.

I suggest buying a few locomotives that have DCC decoders already installed or that are very DCC friendly(a simple drop-in plugn'play decoder).

The rest of the fleet of locomotives can gradually be transitioned to decoders over a period of time. This means completely running a DCC layout and forgetting about a layout that can be run on DCC or DC with the flick of a switch.

If you choose to run a layout that can be switched from DCC to DC, you risk the high probability that you can blow out your DCC command station and or destroy decoders in the locomotives you might still have on your layout or in most probability destroy the motors of DC locomotives if they are left on the track when you're running in the DCC mode.

So I suggest you make the choice to completely switch over to DCC. You'll never look back.

I still have locomotives on my roster that still need decoders after almost 14 years of running a DCC layout.

Sunday, October 26, 2014

Measuring Voltage And Amperage On Your Unitrack DCC Layout Or Any DC Layout

Measuring Voltage And Amperage On Your Unitrack Layout

It's important to periodically check the voltage and amperage on your Unitrack layout. For this I use a RRAmpmeter from Tony's Trains. I'm not a stock holder in Tony's but I really like their products.

Monitoring the voltage and amperage is especially important in a DDC or DC layout.

Here is a link for the RRampmeter. You simply place the contacts on the track rails and it measures either the voltage or amperage. What you want is constant voltage on your layout for the entire length of an operating session.

You can also measure amperage which will tell you the amperage used if you run three trains at a time, plus 20 turnouts, plus lighted passenger cars and a signal system. This is especially important to DCC users.

Have fun with this...

Here is the link for the RRampmeter:

http:
//www.tonystrains/technews/rrampmeter


Building Bench Work For The "new" JJJ&E


I started to build the bench work  for the "new" JJJ&E in February 2009. Before I moved into the house, a friend of mine helped me build the bench work for the "new' JJJ&E in the garage of the new house. We built nine separate modules that we pre-painted all the wood with a flat black finish.

Each 50"x50" turnaround areas were separate modules. We built two modules 30" inches wide for each side of the layout. On all the modules, I used extra sturdy legs on each module to support the bench work.

On the 12' side of the room, we built three modules 30 inches wide. when the train room was finished, we assembled the nine pre-painted modules in the room. This was the easy way to assemble the bench work. It was like putting a puzzle together. When all nine sections were assembled, I used a 3/4 inch plywood base to support four one inch sections of pink foam. Each individual piece of pink foam was glued in place with Liquid Nails that is compatible with foam. Bricks were place on the foam to keep constant weight on the foam sections. 

For the backdrop I used Vinyl Roof Flashing 24 inches wide. The Vinyl Roof Flashing comes in 50' rolls and can be purchased at Home Depot or Lowe's. I cemented the Vinyl Roof Flashing to the walls above the bench work with a Formica cement. The beauty of the Vinyl Roof Flashing is that there are no seams in the backdrop. The Vinyl Roof Flashing can also be rolled into the corners of the room. You will see this in the photo's below. I used a wood molding above the Flashing which will be painted the color of the walls. I had Lowe's mix me a blue color for the sky background. I'm not good at making clouds so clouds aren't present on the backdrop. I will use numerous backdrop buildings along the full 18 foot length of the Turntable area/Switching Yard. Backdrop buildings will also be used along the San Marino side of the layout on the far right. The windows on the Mysterious Middle Part Of the "new" JJJ&E will be covered with two 2'x4' Styrofoam boards that will be removable to get access to the windows.

On the 12' middle part of the "new" JJJ&E which I call the Mysterious Part of the "new" JJJ&E I decided to used commercial printed backdrop buildings showing an industrial area before entering the town of San Marino.

After cementing the Vinyl Roof Flashing to the walls above the train room, we started to staple in place bendable 1/4 inch fascia in the 50 inch turnaround areas and against the other modules. This fascia was sanded smooth and any defects in the wood fascia were filled in. The fascia will be painted at a later date, after all repairs to the fascia were completely dry. I left the lip of  the fascia 5/8" above the foam in order to prevent any disastrous accidents due to any derailments. I will hide that 5/8 inch lip with some scenic effects. I've done this before on other layouts of all major scales.

The left side of the bench work is 18' long. The middle part of the bench work under the windows is 12' long. The right side of the bench work is approximately 16' long. The two turnaround areas are 50'x50". The depth of the bench work is 30". All areas of the bench work are very accessible.

As you can see, I left plenty of room in the center isle to move about. Narrow isles don't work in train rooms. I have three comfortable swivel chairs in the room for siting and observing the layout.


Saturday, October 25, 2014

A New Train Room For The New JJJ&E


I started to build my home in North Texas in July 2008. I decided to incorporate a finished train room in the house when I first designed the house. The house was completely finished in February 2009. It is one story home with approximately 4400 square feet. The train room is adjacent to my office/computer room in the front of the house. The train room is 21'x12' which was more than enough to build a inversed "U" shaped  large N scale layout.

The layout itself is 18'x12' and there is plenty of room for a work bench and shelving to store locomotives and rolling stock.

Now for a little bit of history of Frisco Texas. Frisco is located where the Chisolm Trail started in Texas in the 1860's. Cattle drives originated from this point on to rail heads in Kansas and Missouri in the late 1860's. A great motion picture to see about this part of the country is RED River starring John Wayne and Montgomery Clift (1948). It is often on cable TV.

In the last two or three years The Museum Of The American Railroad now resides in the center of Frisco. They do have one of the last remaining Big Boys  #4018 that has been fully restored. It traveled from Lake Park Texas to Frisco in the past six months on BNSF tracks where it is on display. It is a magnificent piece of equipment.

          Photo # 1  UP "Big Boy" #4018 On The Way To Frisco Texas From Lake Park Texas.Photo Taken By Ken Fitzgerald Of Dallas Morning News

Link For The Museum Of The American Railroad

http://www.museumoftheamericanrailroad.org/

Now onto the photo's of the new train room of the "new" JJJ&E.  From July 2008 till February 2009, I traveled to Texas from Florida every three to four weeks to check on the build of my home. One of my daughters lives in Frisco, and she kept up with the daily happenings. The photo's I took of the train room during the build were taken with a Nikon Coolpix 4300 for convenience. I normally use a Nikon D50 or a Nikon D5100 DSLR for all my photo's of the layout.

Most homes in North Texas are brick homes. I used eight high hats in the ceiling for lighting. I used 100 watt CFL natural light bulbs in the eight lights (5500K). This gives the train room uniform lighting with natural light. I keep the thermostats in the house at 77 degrees in the summer and 72 degrees in the winter. This keeps thermal expansion down to a minimum and I never had any issues with the track or wood bench work. 77 degrees might seem high to you folks living up north but you must remember summertime temperatures in North Texas can easily top 105 degrees on a constant basis.

I also use a fan in the train room and fans in all the rooms of my home. This keeps air circulating and the temps in each room actually feel cooler  than 77 degrees.


                      Entrance To The Train Room


                     Entrance To The Train Room From The Finished Utility Room


  The Three Windows Are The Windows To The Train Room. To The Left Of the Train Room Is My Office/Computer Room